Tag: recipe:

  • Mastering the Art of Homemade Baguettes: A Family Recipe Revealed

    Mastering the Art of Homemade Baguettes: A Family Recipe Revealed

    Few things evoke the essence of comfort and satisfaction quite like a freshly baked French baguette. With its crisp crust and soft interior, a perfectly crafted baguette can elevate any meal or simply be enjoyed on its own. Fortunately, my family has honed a foolproof recipe for easy homemade baguettes that requires just four simple ingredients and minimal effort.

    Homemade Baguettes

    For years, my family has been delighting in the process of baking these baguettes, and now, I’m excited to share our beloved recipe with you. With just a few pantry staples and some basic equipment, you too can experience the joy of baking your own delicious baguettes at home.

    Ingredients
    – 5 cups of all-purpose flour
    – 5 teaspoons of active yeast
    – 1 teaspoon of salt
    – 2 cups of warm water
    – (optional) 1 egg + ¼ cup water for egg wash

    Equipment
    – Stand mixer with bread-hook attachment
    – Large bowl
    – Cookie sheet
    – Rolling pin
    – Parchment paper
    – Plastic wrap

    Mixing the Dough
    Begin by combining 2 cups of flour with the yeast and salt in a stand mixer. Gradually add 2 cups of warm water and mix on low speed until a sticky base dough forms. Then, add the remaining 3 cups of flour and continue mixing until a thick, semi-sticky dough ball is formed.

    Letting the Dough Rise
    Transfer the dough to a greased bowl, cover it with plastic wrap, and let it rest in a warm place for about an hour. During this time, the dough will double in size as the yeast works its magic.

    Shaping the Baguettes
    After the dough has risen, divide it into two equal portions and shape each portion into a ball. Roll out each ball into a flat, ovular shape using a rolling pin, then roll it up into a long tube, pinching the ends shut. Place the dough tubes on a prepared cookie sheet and let them rest for another 20 minutes.

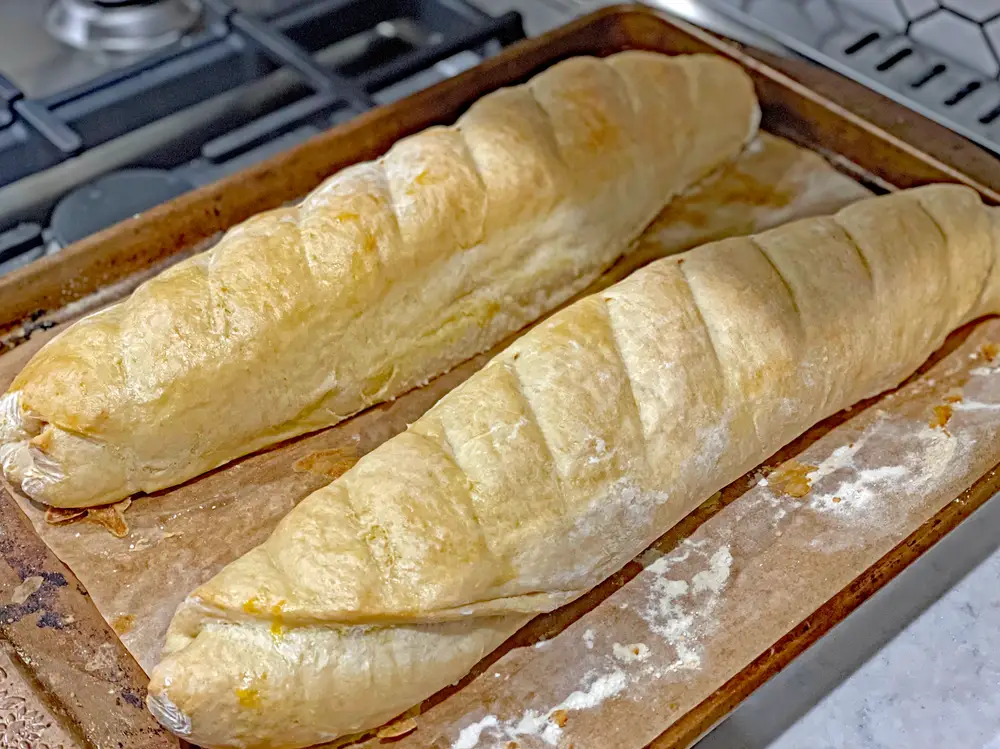
    Baking the Baguettes
    Preheat your oven to 375°F while the dough rests. If desired, brush the baguettes with an egg wash for a crustier finish. Then, slash the risen dough diagonally with a serrated knife and bake for 20 minutes. After 20 minutes, apply another coat of egg wash and rotate the pan in the oven for even baking. Bake for an additional 15 minutes until the baguettes are golden brown and crisp.

    Enjoying the Baguettes
    Once baked, transfer the baguettes to a cooling rack to cool slightly before slicing and serving. These homemade baguettes are best enjoyed fresh out of the oven, but they can also be stored for up to two days in an airtight container. For longer storage, freeze the baguettes and reheat them in a preheated oven at 450°F for about 10 minutes.

  • Soft and Fluffy Pita Bread: A Simple Recipe for Success!

    Soft and Fluffy Pita Bread: A Simple Recipe for Success!

    If you want tasty pita bread better than what you buy, try making it yourself! You can bake them in the oven and watch them puff up like clouds, or cook them in a skillet for soft and fluffy flatbread. This easy recipe has lots of tips to help you along the way. These homemade pitas turn out soft and fluffy. When you bake them, they create the perfect pocket for filling with hummus, falafel, and more.

     Pita Bread

    We’ve been searching for a great pita bread recipe for a while, and we found it. This recipe swaps baking powder for yeast, making the pita taste amazing and helping create that airy pocket.  With just a few simple ingredients like flour, warm water, instant yeast, sugar, and salt, you can make fluffy, soft pita bread ready for sandwiches or dipping.

    To make pita bread with a nice pocket, we need yeast. Activate it by mixing warm water, yeast, and sugar in a bowl. Wait for 5 to 10 minutes until it froths and bubbles. Then gradually add flour and salt, gently knead the dough in the bowl, cover it with a towel, and let it rise in a warm spot for an hour until it doubles.

    Once the dough has doubled, divide it into six equal pieces. Roll each into a smooth ball, then flatten into disks. Use your fingers to flatten the dough gently to keep as many air bubbles as possible. Let the dough rest, and then you’re ready to cook them.

    You can cook pita bread in two ways: in a skillet on the stove or bake them in the oven. The skillet makes soft pita without a big pocket, like what you see at Greek restaurants. If you want a big, tall pocket, bake them instead. To cook pita bread on the stove, heat a heavy-bottomed skillet over medium heat, add some oil, and then cook the pitas until they’re blistered on both sides and cooked in the middle.

    To bake pita bread in the oven, preheat your oven to 475°F (246°C). A hot oven is key to getting that pocket. Cook the pita bread on a pizza steel or baking sheet until they puff up and turn light brown around the edges. You can store pita bread at room temperature for up to 2 days or freeze it for up to 3 months. To warm it up, bake it in a 350°F oven, wrap it in a damp paper towel and microwave it, or heat it in a dry skillet on the stove.

    If you’re having trouble getting your pita bread to puff up, make sure you’re using active yeast and that your oven is preheated for at least 30 minutes. Stovetop pita bread is delicious but less likely to puff up. For the best chance of achieving a pita pocket, bake them in a preheated oven.

    You can fill your homemade pita bread with all sorts of delicious things! Try hummus, baba ganoush, tzatziki, spinach artichoke dip, labneh, falafel, grilled chicken, veggies, seared halloumi cheese, roasted red pepper hummus, or smashed chickpea salad. Making your own pita bread is fun, easy, and delicious.

  • Easy Recipe: Garlic Potato Ring Chips for Snacking Delight

    Easy Recipe: Garlic Potato Ring Chips for Snacking Delight

    We all love chips, and this easy recipe introduces a delightful twist to the classic potato chip. With the flavors of garlic and a unique ring shape, these Garlic Potato Ring Chips make for a tasty treat that both kids and adults will enjoy.

    Garlic Potato Ring Chips

    Ingredients
    1. Chilliflex – 1 tbsp
    2. Crushed garlic – 1 tbsp
    3. Semolina – half cup
    4. Potato – 1 (large)
    5. Butter – 3 tbsp
    6. Water – 1 cup
    7. Salt – 1 tsp
    8. Cornflower – 1 tbsp
    9. Coriander leaves – 2 tbsp
    10. Beetroot – 1 tsp
    11. Chilli powder – 1 tsp
    12. Chaat masala – half teaspoon
    13. Soybean oil – as needed
    14. Tomato or chili sauce

    Procedure
    1. Start by grating the potato finely and crushing the garlic.
    2. Blend the semolina to a smooth texture.
    3. Heat a pan and add three spoons of butter. Once melted, lightly fry crushed garlic.
    4. Stir continuously while adding a cup of water, chilli flakes, and salt.
    5. Gradually mix the blended semolina into the mixture.
    6. Add the grated potatoes and mix well. Turn off the heat when the mixture separates from the pan.
    7. Allow the mixture to cool slightly, then knead it well with your hands.
    8. Mix in cornflower and chopped coriander leaves to form a smooth dough.
    9. Apply oil to a balloon and pidi, then cut the dough into ring shapes using a cutter or glass.
    10. Heat oil in a wok and fry the rings until they turn red.
    11. Once fried, mix chilli flakes or chilli powder with half a teaspoon of chaat masala and gently rub the mixture on the chips.
    12. Your Garlic Potato Ring Chips are ready to be served with tomato or chili sauce.

    Garlic Potato Ring Chips

    With simple ingredients and easy steps, this recipe allows you to create a flavorful and unique snack. Whether enjoyed during an evening get-together or as a quick treat, these Garlic Potato Ring Chips are sure to be a hit with everyone. Try making them at home for a delightful snacking experience.